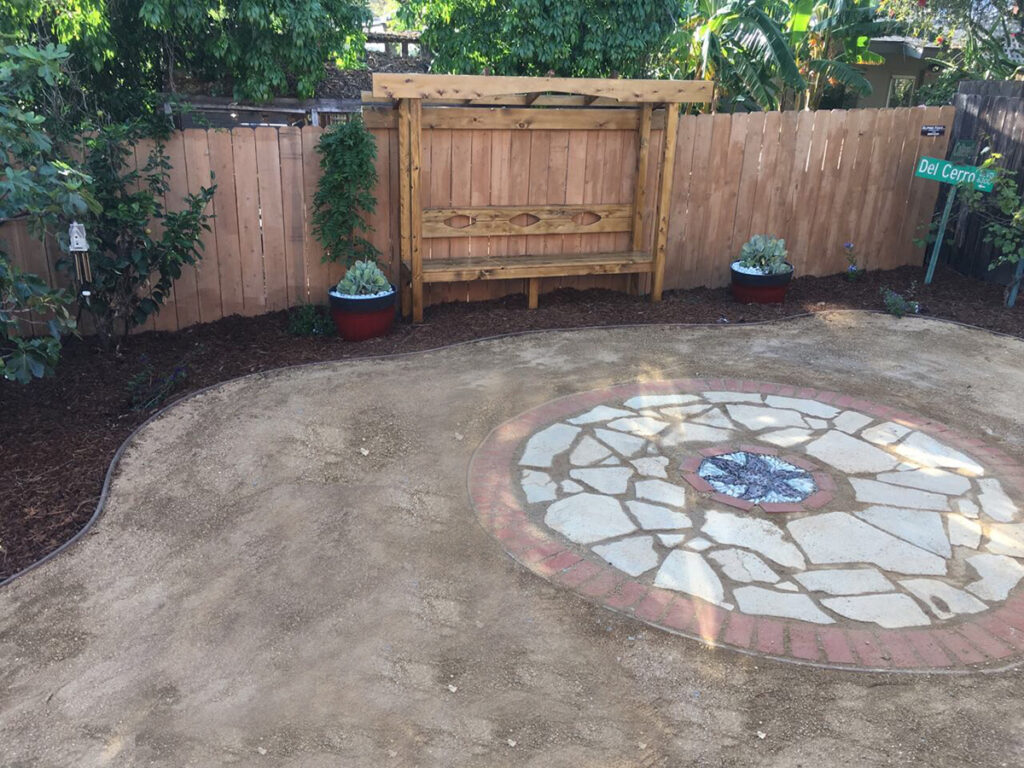
Finding that just-right yard accent doesn’t mean you have to spend hours scouring Pinterest for inspiration. Sometimes the answer is right under your nose—in the materials you already have and maybe a few new ones. This decorative mosaic patio is a perfect example.
Note the mortared brick edges, dry set flagstone, and—the focal point of it all—that mortared pebble mosaic at the center. Whether it’s utilized as an area for tables and chairs or simply for viewing from a pergola bench, this mosaic patio is a yard accent that’s sure to serve as a conversation piece for years to come.
Here’s how I pulled together this mosaic patio with mixed materials and how you can, too!
MATERIALS
~87 bricks
~1/2 pallet of flagstone
-a few bags of 1″-3″ pebbles
-type S mortar mix
-6 concrete bags (60 lbs each)
-4 bags of mortar (90 lbs each)
-4 bags of ¾” gravel (50 lbs each)
-2 4”x20’ composite edging
-8 composite stakes (for edging)
-3 wood stakes (for leveling)
-1” box of screws (for stakes)
-bucket of water
-string
-1 roll of landscape fabric (optional)
– 1 wheelbarrow of decomposed granite to fill in voids
*material sizes and quantities and tools may differ per project
TOOLS
-rubber mallet
-flat shovel
-mini sledge
-mini level & line level
-level
-drill
-hand saw/circular saw (for edging)
-pickaxe
-pencil
-utility knife
-brick hammer
-push broom
-large sponge
-muriatic acid and toothbrush (optional)
-hose with adjustable nozzle
-small hand trowel
Step 1: Prepare your mosaic patio area


Prepare your circular mosaic patio area by selecting or making a level area. Ours is in a decomposed granite area but you can also do this directly in the dirt.
To create a circle, mark the center of the area with a dowel or stake with a screw on top (see step 5). Attach a string with a loose loop around the dowel. Measure out 5′ or the desired radius of the circle. Walk around the dowel marking the radius with spray paint as the string is pulled taut. I placed four stakes creating an ‘X’ on the 10′ circle; this is to attach the 4” composite edging to the inside of the stakes with a drill and screws. Make sure the stakes are 1” below the top of the edging so they don’t show.
Use additional stakes to secure where one edge stops and the other starts and fill in between the four main stakes so the circle keeps its shape. Cut the extra edging off with a hand saw or circular saw. Then, overlap and attach to the final stake to make a complete circle.
Step 2: Dig out brick edge footing


Now that we have our circle, we need to prepare a base for the bricks. (There are so many colors and textures for bricks.) Use a flat shovel to remove the decomposed granite or soil along the inside edge of the circle. If you placed landscape fabric across the yard, use a utility knife to cut out along the composite edge, fold the landscape fabric back, and use pieces of stone to hold it down. Next, use a pickaxe and shovel to dig out a circle that’s about 10” wide and 10” deep.
Step 3: Add gravel as a base material
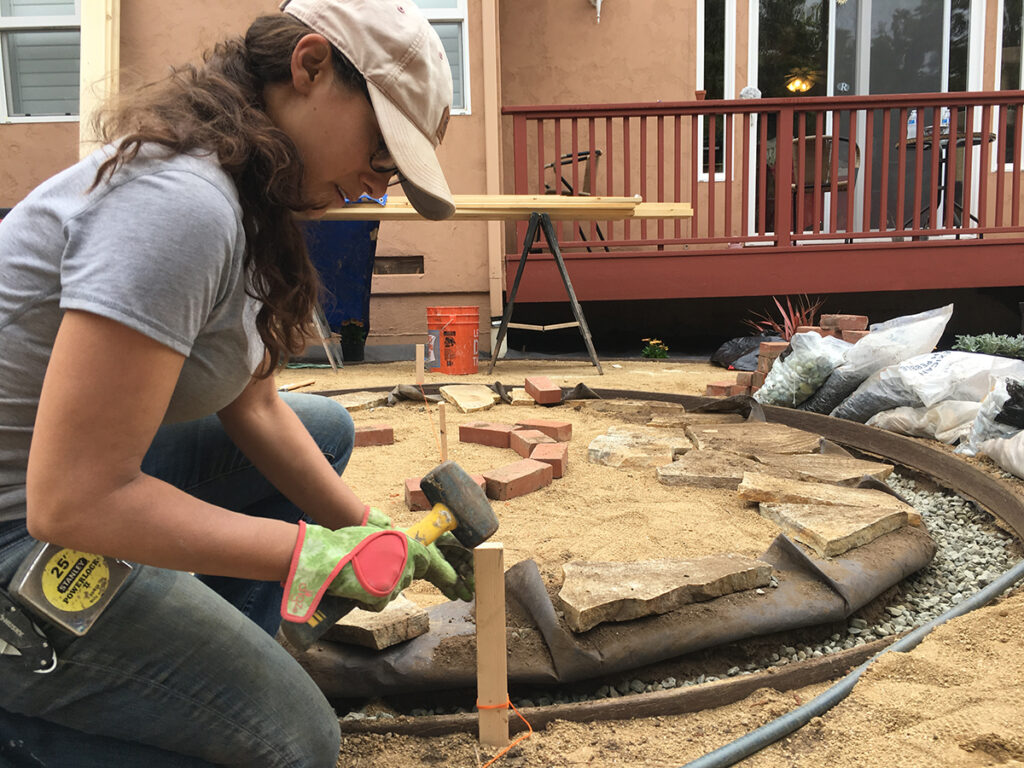
Add around 2” of ¾” angular gravel to the base of the circular trench. We want to keep the patio level from side to side, so use the mini sled and wood stakes to mark two points outside the circle. Attach a string with a line level and pull across so it touches the composite edging on both sides. Make any adjustments to make the composite board level, as you’ll use this as your guide to set the bricks. Check a few points with stakes.
Step 4: Pour concrete footing


Mix up your concrete and shovel it into the circular trench. I used a brick to screed the concrete. You want the concrete level to be ½”-¾” below the height of the composite edging guide; this leaves room for the mortar. Leave the concrete to dry.
Step 5: Mark the center detail

Attach a screw to the center of the center stake and also create a loop knot that measures 2’8” from the end of the loop. Attach the loop around the screw. Then, use a pencil, stick, or finger to press into the decomposed granite, marking a circle around the center.
Step 6: Install mosaic brick footing
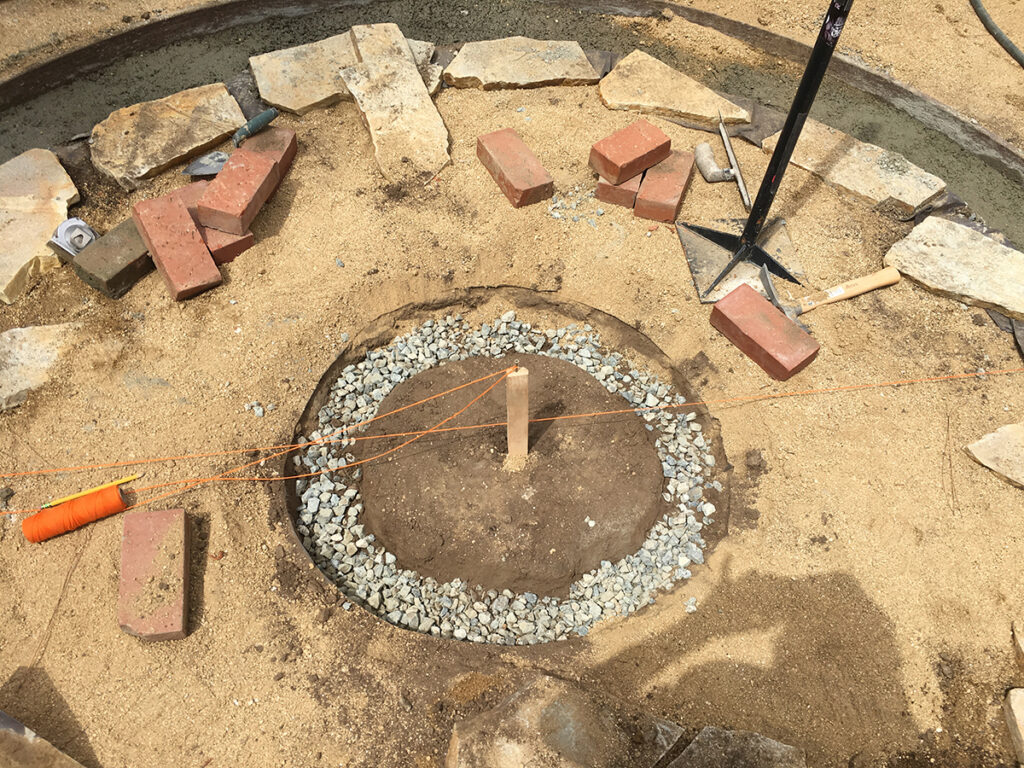
Repeat the steps of the outside brick edging. Remove decomposed granite (or soil), cut out landscape fabric, and remove 8” of soil. Fill the outside ring with 2″x4″ of gravel and pour a concrete footing. Use a brick to level the concrete to about ½” -¾” lower than the level string to keep room for the mortar.
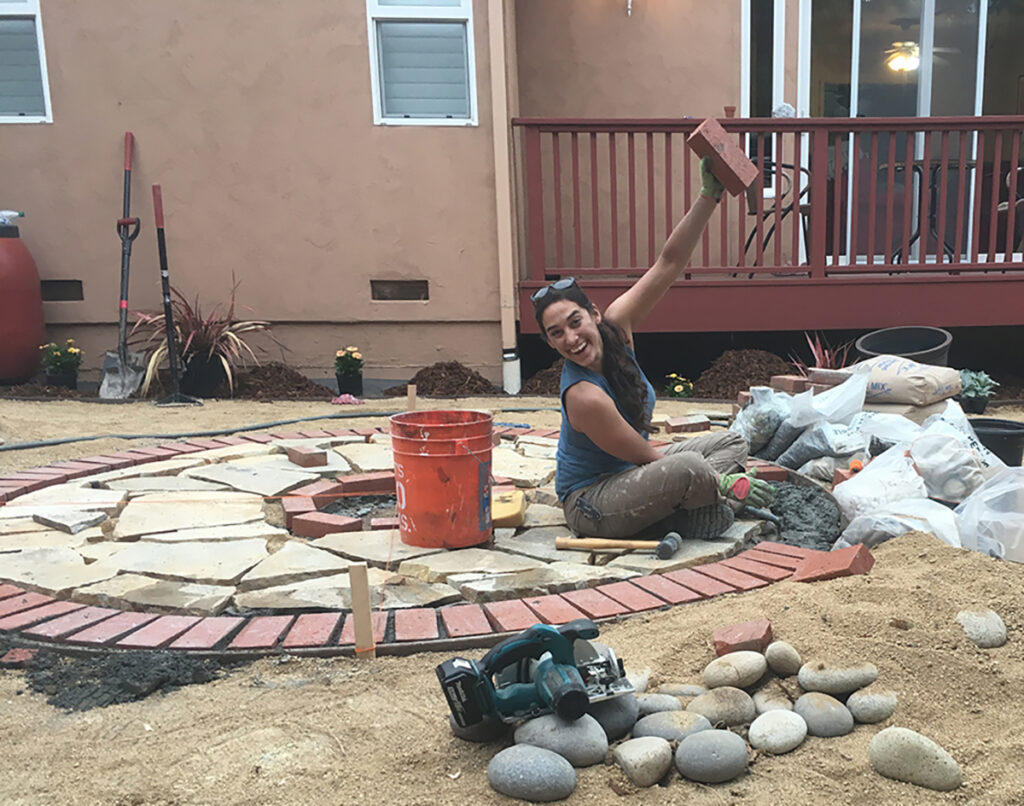
Step 7: Level out the flagstone
While the concrete is drying, lay out your flagstone pieces. They will all be different thicknesses and will need adjusting. Add or remove decomposed granite to get them level and check with a level. If you’re doing this in soil, trench out and add 1″ or so of masonry sand to help level out stones. Patio grade “dry set” flagstone pieces are typically at least 1.5″-2″ thick. Also, try to match up similar edges as much as possible. You can use a brick hammer to chisel off edges—but you may lose more than you bargain for if you’re new to this, so do this with care! Step on the flagstones and if they move under your weight, adjust the decomposed granite or masonry sand to stabilize them.
Step 8: Mortar the brick
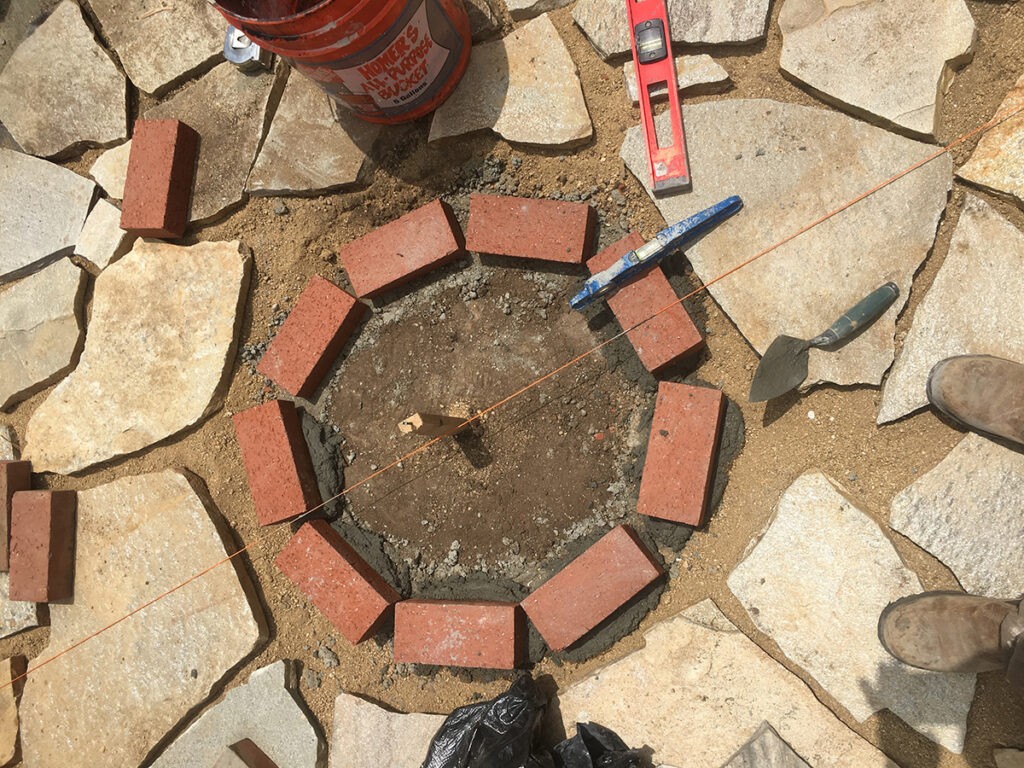
Next, mix up your type S mortar to a peanut butter consistency. Use an angler hand trowel to place ¾” of mortar on the dry concrete. Use the tip of the trowel to create an undulated mark on the blob of mortar. This creates suction and room for the mortar to push out. Use a rubber mallet and mini level to level the brick with the top of the stone, and use the string guide for reference. Pro tip: Cut or break bricks in half to get tighter joints between bricks.
Step 9: Place side brick edge


Place mixed-up mortar on top of the dry concrete with the trowel. Use enough mortar so that the mortar pushes out when placing the brick; this extra bulge will hold the bricks in from side to side. Keep the bulge at least ½” below the top of the brick to leave room for decomposed granite to be swept in later. Eyeball the spacing between your bricks; since it follows a radius it will be about ½” on the inside and about 1’ on the outside edge. Use a mini level and a rubber mallet to level each brick to each other and the stone.
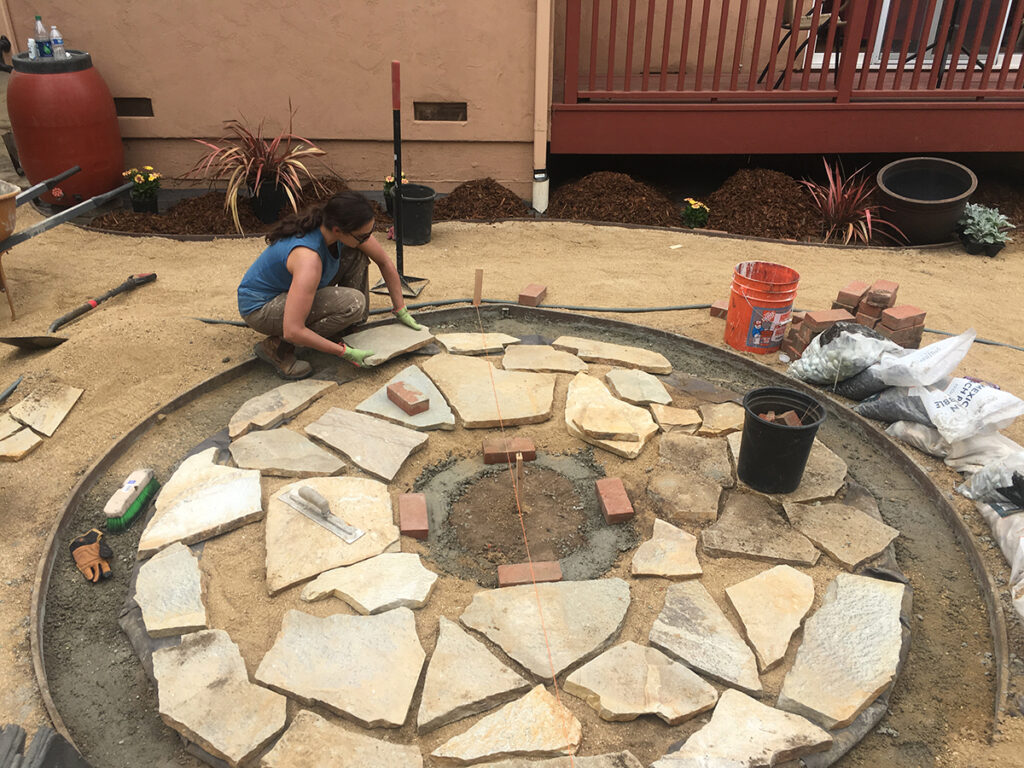
Step 10: Let the mortar set and fill in the voids


Once the mortar is set, use half a wheelbarrow full of decomposed granite and a push broom to fill in the voids between the flagstone and brick. Then, take a hose with an adjustable nozzle and sprinkle the decomposed granite to help it settle in the voids. Use the remaining half wheelbarrow of decomposed granite to sweep into the joints.
Step 11: Prepare your pebble mosaic layout


Now it’s time to play with the mosaic. You can make any design! I wanted to use some contrasting colors to make the edges defined. To start I sketched out an idea using my finger and dry mortar. Next, I mixed up some mortar and placed about 2″ blob and worked section by section.
Step 12: Install your pebble mosaic


Next, select long and narrow red Mexican beach pebbles and press them into the mortar. Leave about ¼”-½” of the stones revealed. Continue to mix up and work section by section. (If you leave out too much mortar, it will harden and make it hard to press stones in.) Use a piece of wood, such as a scrap piece of 2″x4″, to press down on high stones so that the mosaic stays level. If the mortar starts to set up, use a rubber mallet to press in the stone. (If it seems difficult to press the stone in, remove the mortar and start with fresh pliable mortar.) Continue to fill in sections of the design, placing stones on the outer edge and using contrasting color stones to make the design pop.
Step 13: Clean up and admire your mosaic patio


Spoiler alert: If mortar gets on the stones it dries white and looks messy. So, make sure it’s as clean as you can get it. Use a large rung-out sponge to clean off excess mortar from the stones, and wash your sponge in a bucket of water after every swipe. If needed, use a toothbrush and diluted muriatic acid to clean off missed mortar or film from the mortar. Finally, leave it to dry, and then enjoy your mosaic patio!